
Nearly 60% of drivers returning a leased vehicle get hit with at least one wear-and-tear charge. With typical bills ranging from $300 to over $1,500, the end of your lease can feel less like a finish line and more like a financial trap. This feeling is the “anxiety gap”—the space between the leasing company’s vague contract terms and your fear of subjective, costly penalties.
This isn’t just about a few scratches. It’s about knowing exactly what inspectors look for, what you can fix yourself, and when the cost of repairs signals it’s time for a different strategy. This guide provides a clear, actionable plan to help you navigate the return process and protect your wallet.
What Is a Lease Return Checklist?
A lease return checklist is a structured plan that helps drivers prepare their leased vehicle for inspection before returning it to the leasing company. Rather than waiting until the final inspection, the checklist allows you to identify potential issues early, schedule repairs if necessary, gather required documentation, and understand your financial options before your lease expires.
Most leasing companies evaluate vehicle condition using established wear-and-tear guidelines, mileage limits, and equipment requirements outlined in the original lease agreement. Completing each step of a lease return checklist helps reduce surprises while allowing sufficient time to compare the costs of returning the vehicle versus completing a lease buyout.
Whether your goal is avoiding excess wear charges, reducing mileage penalties, or preserving vehicle equity, early preparation creates more opportunities to make informed financial decisions before lease maturity.
Understanding Your Lease-End Responsibilities
Your lease agreement outlines the responsibilities you must satisfy before returning the vehicle. These obligations often include maintaining the vehicle according to the manufacturer’s recommendations, remaining within your contracted mileage allowance, returning all original equipment, and presenting the vehicle in acceptable condition based on the leasing company’s inspection standards.
Reviewing your lease agreement approximately three months before lease maturity allows you to identify important deadlines, understand disposition fees, verify your purchase options, and determine whether requesting a lease payoff quote or vehicle appraisal may benefit your decision-making process.
The 90-day countdown to a penalty-free return
Procrastination is the most expensive lease return mistake. Don’t wait until the week before your return date to discover a costly issue. Breaking the process down into phases turns anxiety into action.
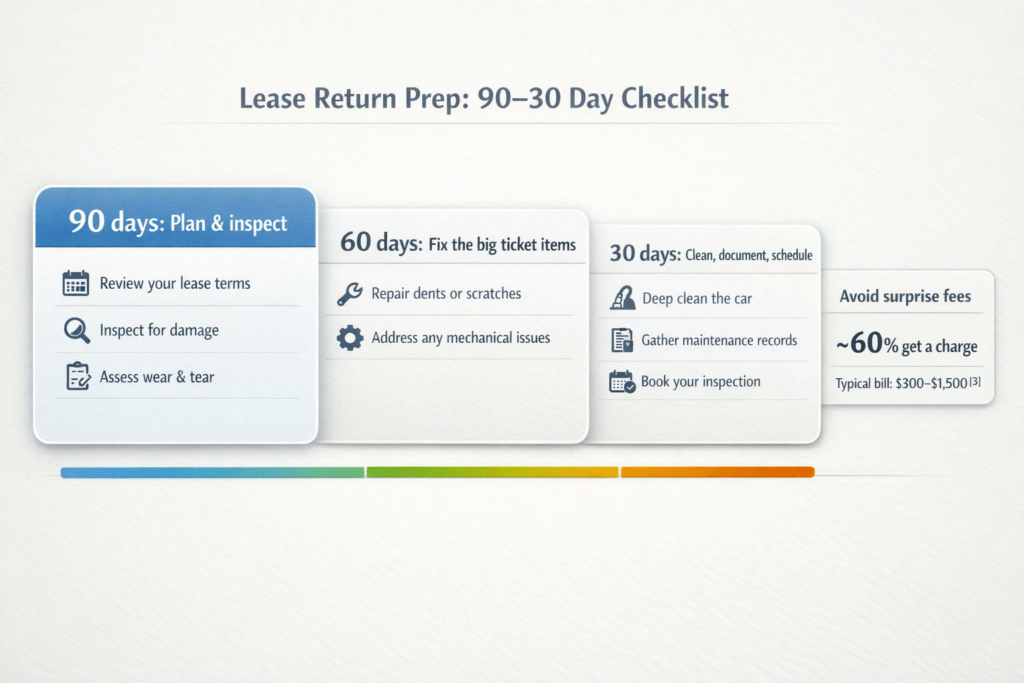
A simple 90/60/30-day plan that turns lease-return anxiety into actions—inspect early, fix expensive items first, then document and schedule.
90 Days Out: The Pre-Inspection
This is your intelligence-gathering phase. Conduct your own inspection using the same standards a professional would.
- Wash and detail your car: You can’t assess damage under a layer of dirt.
- Inspect in bright, indirect sunlight: This reveals dents and scratches that garage lighting hides.
- Take photos: Document every panel, the interior, the wheels, and the windshield. This creates a baseline.
- Gather all original equipment: Find both sets of keys, the owner’s manual, floor mats, and any cargo covers. A missing smart key alone can cost $225–$350 to replace.
60 Days Out: Triage and Repair
Now that you know what’s wrong, you can make a plan. Focus on the high-cost items first.
- Get estimates: If you have significant dents or windshield cracks, get quotes from independent shops, not just the dealer.
- Check your tires: This is a major source of fees. We’ll cover exactly what to look for below.
- Schedule professional services: If you need a deep clean, dent repair, or wheel refinishing, book it now to avoid last-minute rush fees.
30 Days Out: Final Touches and Documentation
This is the final stretch.
- Schedule the official inspection: Have it done at your home or office, not the dealership. This gives you a neutral environment and more control.
- Handle minor fixes: Touch up small paint chips and clean any interior stains.
- Compile your records: Keep receipts for any new tires or repairs as proof of maintenance.
Understanding Lease-End Inspection Standards
Although individual manufacturers publish their own wear-and-tear guidelines, many leasing companies evaluate vehicles using similar inspection principles. Inspectors typically assess body panels, paint condition, glass, wheels, tyres, interior upholstery, electronics, and missing accessories while comparing the vehicle’s condition against normal everyday use.
Understanding these standards before inspection allows drivers to prioritise repairs that provide meaningful savings rather than spending money correcting cosmetic imperfections that may already fall within acceptable wear guidelines. Independent pre-inspections can also identify repair opportunities before official lease-end evaluations take place.
What is “excess wear”? The inspector’s visual cheat sheet
The most stressful part of the lease return is the subjectivity of “normal” versus “excess” wear. While every manufacturer has slightly different rules, most use simple, universal tools for measurement. You can do the same.
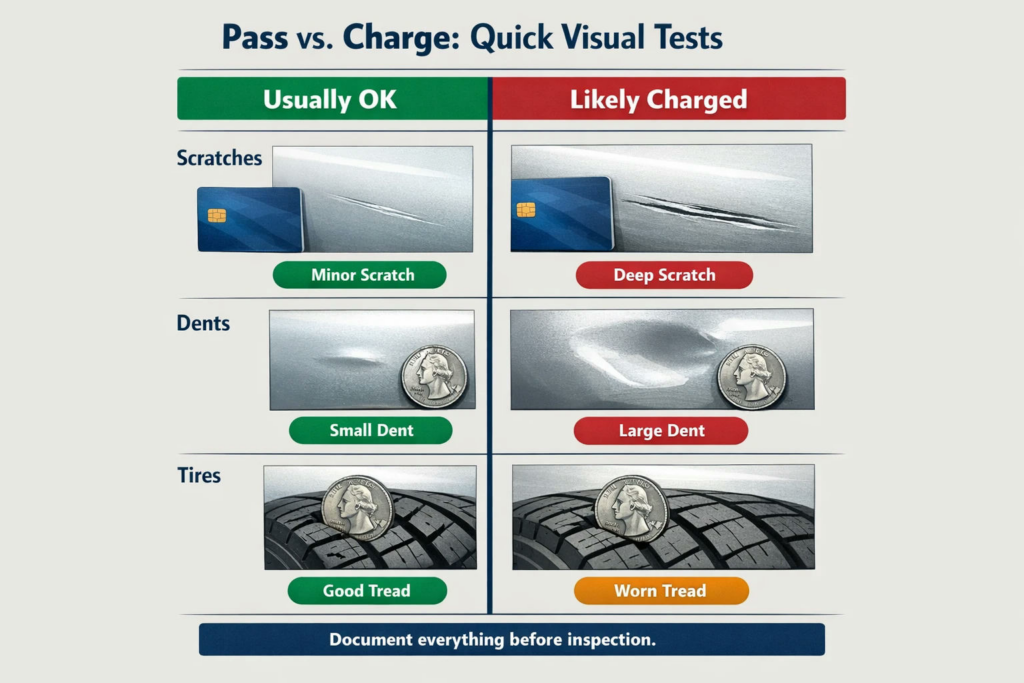
Seeing the thresholds matters. Use the credit card and quarter as quick reality checks—then take photos so you can contest anything questionable.
- The Credit Card Test (Scratches): Most leasing companies consider any scratch that is shorter than the length of a standard credit card (about 2 inches) to be normal wear. If you have multiple scratches on a single panel, that may be deemed excess.
- The Quarter Test (Dents): Dents smaller than the diameter of a quarter are typically acceptable. Anything larger, especially if it has broken the paint, will likely be charged. Expect to pay $50–$200 per dent.
- The Penny Test (Tires): Place a penny upside down in your tire’s tread. If you can see the top of Lincoln’s head, the tread is too worn (below 2/32″). All tires must be the same brand, model, and speed rating as the originals. A mismatched set is an automatic charge.
Documenting your own pre-inspection with photos using these tests gives you evidence to dispute any unfair charges from the official inspector’s report.
How Inspectors Evaluate Your Vehicle
Professional lease-end inspections typically follow a structured process designed to evaluate both cosmetic and mechanical condition. Inspectors examine body panels, paintwork, glass, wheels, tyres, lighting, interior surfaces, electronics, and any missing equipment while comparing the vehicle against the wear-and-tear standards established by the leasing company.
Most inspections also verify that routine maintenance has been completed according to the manufacturer’s recommendations. Service records, tyre replacement receipts, and repair invoices demonstrate responsible vehicle ownership and may help clarify questions about maintenance history during the inspection process.
Preparing your vehicle before inspection not only improves presentation but also allows inspectors to evaluate the vehicle more efficiently, reducing the likelihood that dirt or clutter obscures its true condition.
The high-cost triplets: Where most lease return charges come from
While you might worry about every little scuff, inspectors are trained to find the big-ticket items that generate the most revenue. Focus your time and budget on these three areas.
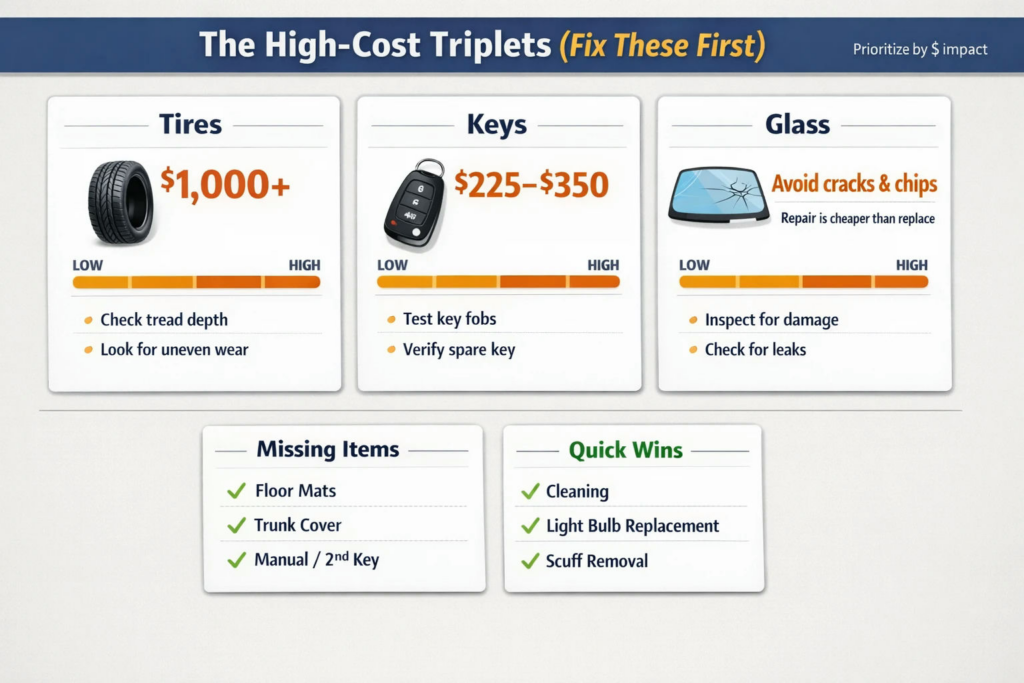
Not all fixes are equal. Start with tires, keys, and glass—the items most likely to create a painful bill—then handle quick wins last.
- Tires: This is the number one source of penalties. Replacing a full set of OEM-spec tires on a modern SUV or luxury car can easily exceed $1,000. It’s not enough to just have legal tread depth; the tires must match the vehicle’s original specifications for size, brand, and speed rating. Don’t get stuck buying a new set of tires for a car you’re about to return.
- Windshield and Glass: A small chip below the driver’s line of sight might be acceptable. A crack is never okay. Windshield replacement, especially on vehicles with advanced driver-assistance systems (ADAS), can be surprisingly expensive due to the need for camera recalibration.
- Keys and Original Equipment: As mentioned, a single lost key fob is an easy $250+ charge. The same goes for the owner’s manual, original floor mats, cargo covers, or a spare tire. Make a checklist of every item that came with the car and ensure it’s inside during the inspection.
Lease Return vs. Lease Buyout Checklist
Once you’ve completed your lease return checklist, the next step is determining whether returning or purchasing the vehicle represents the better financial decision. Rather than focusing exclusively on inspection results, compare the complete financial impact of each option.
Returning the vehicle generally involves completing the inspection process, paying any applicable disposition fees, addressing excess mileage penalties, and resolving wear-and-tear charges before the lease officially concludes. Purchasing the vehicle through a lease buyout typically eliminates many of these return-specific expenses because ownership transfers directly to you.
Drivers should compare the following factors before making a decision: the vehicle’s residual value, current market value, estimated repair costs, potential lease-end fees, financing options, and any positive equity that may exist. Evaluating these elements together provides a more accurate picture than considering inspection costs alone.
If repair estimates approach or exceed the value of common lease-end fees, requesting a lease payoff quote and comparing financing options may reveal that a lease buyout offers greater long-term financial value.
Understanding Vehicle Equity Before Lease End
One of the most valuable steps in any lease return checklist is determining whether your vehicle has positive equity. Vehicle equity represents the difference between your vehicle’s current market value and the contractual lease buyout price established in your agreement.
If the market value exceeds the residual value, purchasing the vehicle may allow you to retain that equity instead of leaving it with the leasing company. Independent vehicle appraisals, dealership purchase offers, and recognised valuation resources can all help estimate your vehicle’s current value before making a final lease-end decision.
Understanding your equity position allows you to compare ownership costs more objectively while avoiding unnecessary repair expenses on a vehicle that may already represent a valuable financial asset.
The buyout escape hatch: When repairs don’t make financial sense
What if your pre-inspection reveals you need four new tires, have a cracked windshield, and a few noticeable dents? You could be looking at over $2,000 in repairs and fees just to give the car back.
This is the point where you must stop and do the math. Pouring money into a car you don’t plan to keep is often a poor financial decision. A lease buyout acts as a “repair shield,” allowing you to avoid every single one of these charges.
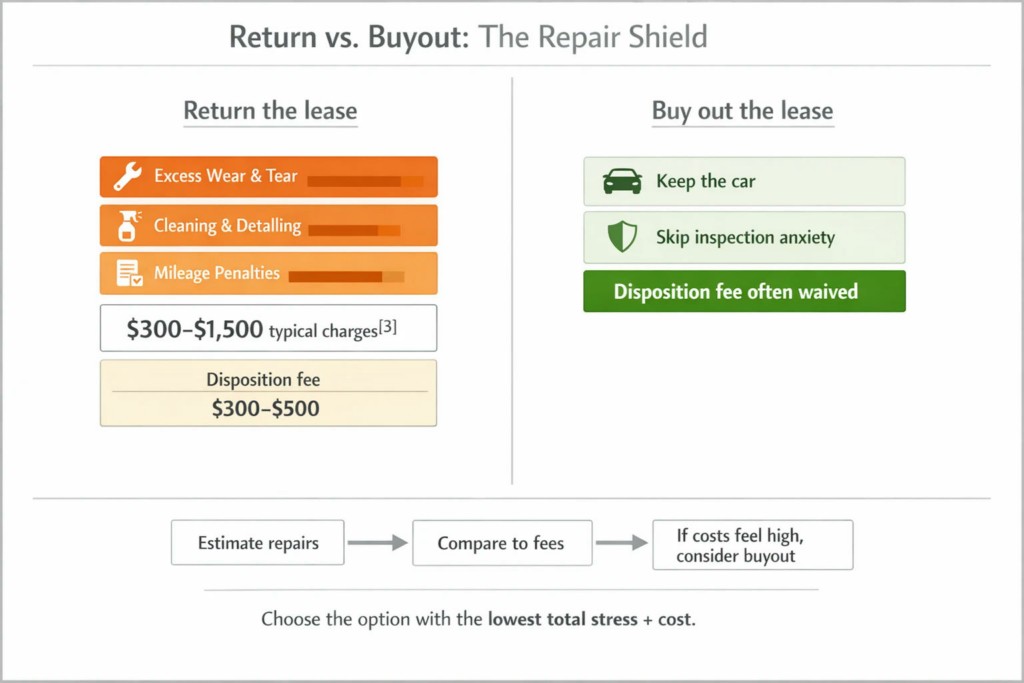
If repair estimates plus fees are adding up, a buyout can function like a “repair shield”—especially when disposition fees are waived.
Consider this simple calculation:
- Cost to Return: Estimated Repairs ($1,200 for tires) + Disposition Fee ($400) + Potential Excess Mileage = $1,600+
- Cost to Buy Out: Your vehicle’s residual value.
When you buy out your lease, you sidestep the entire inspection process. The dings, the worn tires, the scratched bumper—they are no longer a liability. Even better, the disposition fee (typically $300-$500) is almost always waived, which instantly covers the cost of several minor repairs.
How to Compare Lease Return Costs with a Lease Buyout
A complete lease return checklist should include more than inspecting your vehicle. It should also compare the total financial impact of returning the vehicle versus purchasing it. Looking beyond immediate repair costs often reveals opportunities to reduce long-term expenses.
When comparing your options, review your estimated repair costs, disposition fee, excess mileage charges, lease payoff amount, current market value, financing offers, and any applicable taxes or registration costs. Considering these figures together provides a clearer understanding of your overall financial position.
Many drivers discover that while a lease buyout requires financing, the elimination of inspection-related charges and the opportunity to preserve vehicle equity can offset a significant portion of those borrowing costs. Every situation is different, but comparing complete ownership costs leads to more informed decisions than evaluating repair bills in isolation.
Common Lease Return Mistakes
Even drivers who carefully maintain their vehicles can make avoidable mistakes during the lease return process. Following a structured lease return checklist helps reduce these risks while improving your overall lease-end experience.
One of the most common mistakes is waiting until the final weeks of the lease to inspect the vehicle. Early preparation provides more time to complete affordable repairs, compare independent repair estimates, and evaluate lease buyout options before deadlines become restrictive.
Another frequent oversight is replacing tyres with models that do not match the original equipment specifications. Many lease agreements require replacement tyres to meet the manufacturer’s original size, speed rating, and performance specifications, making inexpensive alternatives potentially subject to additional charges.
Drivers also commonly forget to return original equipment such as spare keys, owner’s manuals, cargo covers, charging cables, removable headrests, floor mats, or parcel shelves. Missing accessories may appear minor individually but can collectively increase your final lease-end invoice.
Finally, many drivers overlook the importance of documenting the vehicle’s condition before the official inspection. Comprehensive photographs, maintenance records, tyre receipts, and repair invoices create valuable evidence if unexpected wear-and-tear charges are disputed after vehicle return.
Documents to Prepare Before Returning Your Lease
Organising your paperwork before the inspection helps ensure a smoother lease return process while reducing unnecessary delays. Although requirements vary between leasing companies, most drivers benefit from gathering essential documentation before the appointment.
Useful documents include your lease agreement, vehicle registration, maintenance records, repair receipts, tyre replacement invoices, lease payoff quote, inspection appointment confirmation, and photographs documenting the vehicle’s condition before return.
Having these records readily available demonstrates responsible vehicle ownership while providing supporting evidence should questions arise regarding maintenance history, repairs, or inspection findings.
You don’t have to navigate this decision alone. A specialist can help you compare the numbers, secure financing, and handle all the titling and registration paperwork, making the buyout process simpler than preparing for a lease return inspection.
Before you spend another dollar getting your vehicle ready for return, take a moment to explore your buyout options. It could be the most cost-effective and stress-free way to end your lease.
